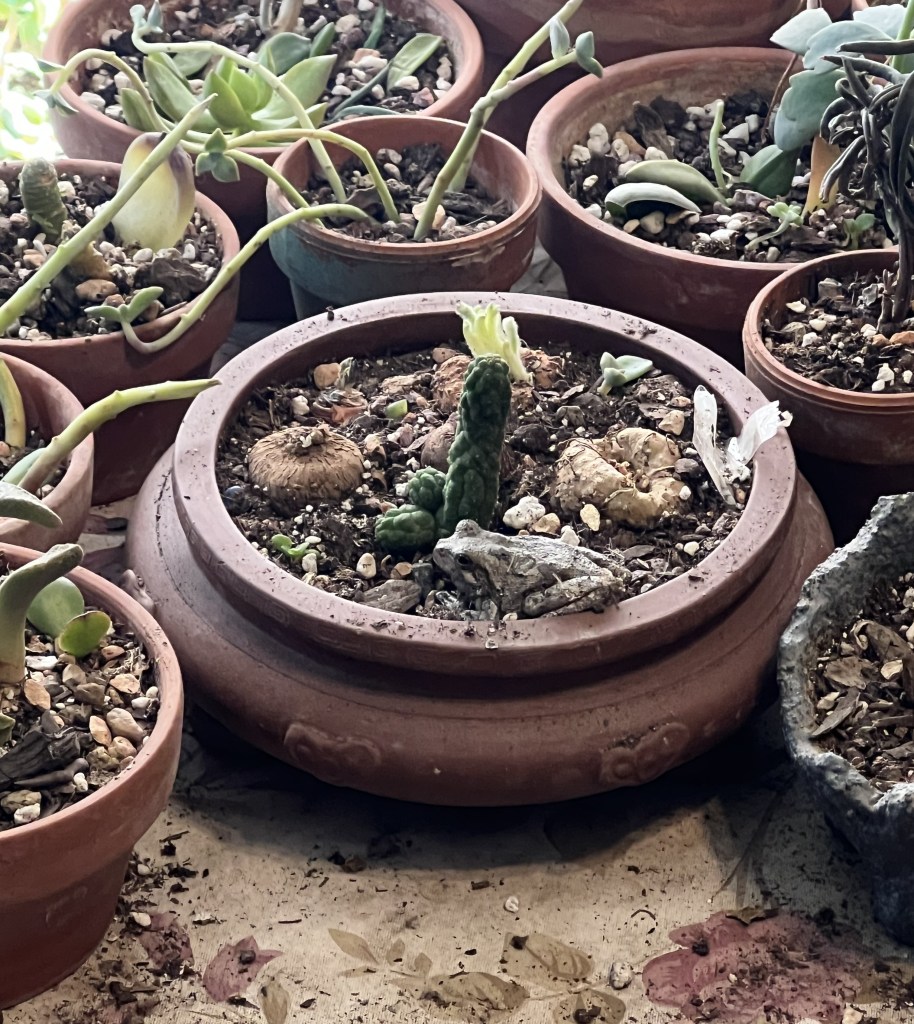
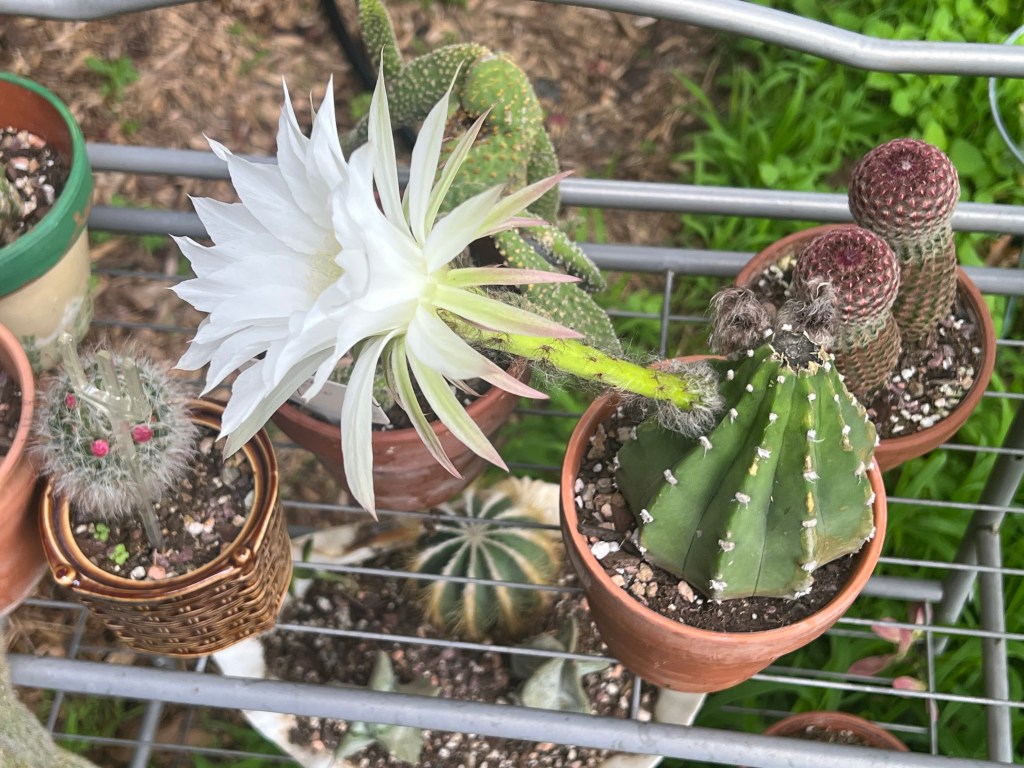
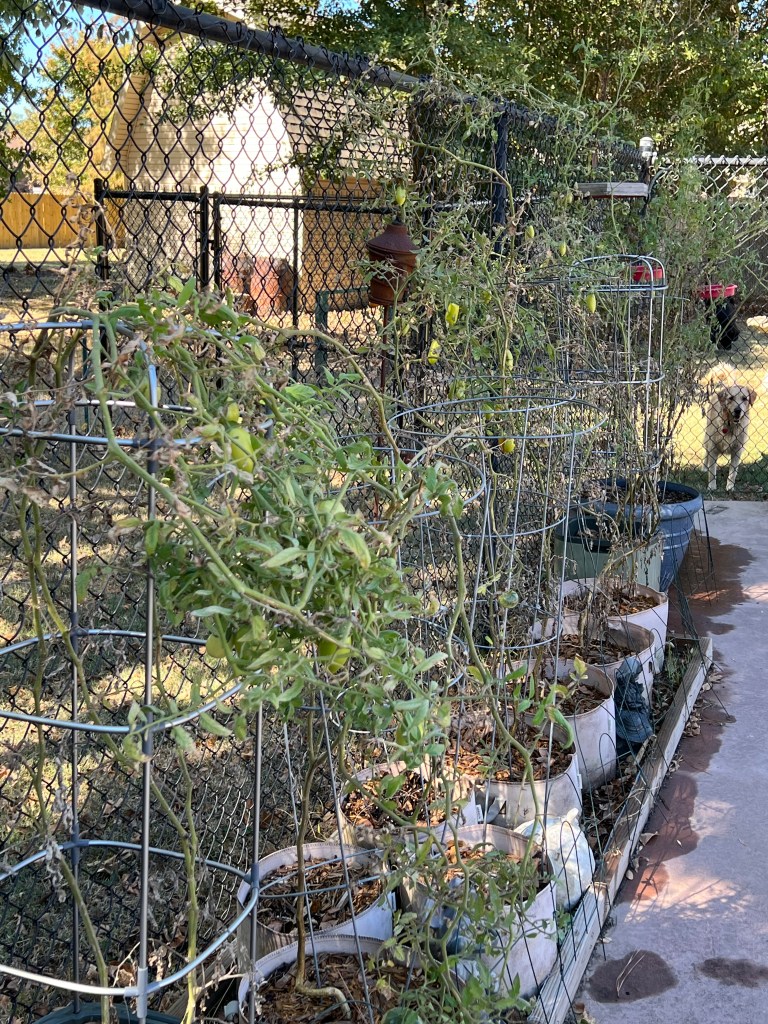
Hammerhead

June 17

Inside the back section of my local newspaper was an article on an invasive species that has been reported in Texas.  The worms have been reported throughout Texas for decades but several weeks of excessive rainfall have literally flushed the creatures into the open.  Usually, during the day the worms can be found under leaves, rocks, or logs.  The rain has brought them out to driveways, patios, and sidewalks.  Ashley Morgan-Olvera, director of the Texas Invasive Species Institute, said while the worms are not a direct threat to humans or household pets, they do have a lasting effect on the ecosystem as they prey on the earthworms that are responsible for distributing oxygen, draining water, and creating space for plant roots.  This genus is collectively known as hammerhead worms.

When I went online, I found hammerhead worms (Bipalium) are a genus of large predatory land flatworms (planarians), also known as broadhead planarians.  The name Bipalium comes from Latin bi- (two) and pala (shovel or spade), because species in this genus resemble a pickaxe.  Hammerhead worms are unique in that they possess a highly ciliated (hair-like) region on the ventral epidermis (a creeping sole) that helps them to creep over the substrate.  The worm is typically light honey colored with a darker collar and one to five strips on its body.  The worm can grow up to 15 inches (38 cm) in length.  Bipalium species are predatory and some species prey on earthworms while others also feed on mollusks.  These flatworms can track their prey.  To feed on their prey, the hammerhead often turns the pharynges out of their mouths (evert), which are located on the midventral portion of their bodies and secrete enzymes that begin the digestion of the prey.  The liquefied tissues are sucked into the branching gut of the flatworms by ciliary action.  Hammerhead worms are native to Asia, but several species are invasive to the US, Canada, and Europe.

The hammerhead does not bite but they do secrete a poisonous chemical for protection from predators which can cause skin irritation.  If a cat or dog eats a hammerhead it will likely get nauseated and throw it up, but there is no long-term threat.  Morgan-Olvera said if you see a hammerhead do not try to kill it or cut it up.  The worm can reproduce asexually and if you cut it up and leave it in the yard a new head could form within about ten days.  To dispose of the worm, place the whole worm in a resealable bag with salt or vinegar and put it in the trash.  The worms can also be sprayed with a combination of citrus oil (orange essence) and vinegar.  You should always wear gloves when handling the worms to avoid irritation and wash your hands thoroughly with soap and water followed by hand sanitizer.  The Texas Invasive Species Institute is asking if you spot a hammerhead that you contact your local extension agent to let them know

THOUGHTS: Four invasive species of hammerhead worms have been found in the US which are thought to have come via infected plants and soil.  The worms are veracious predators and have been identified as a nuisance in the earthworm raising beds of the southern US.  In 2019, the worms were found as far north as Montreal, Canada.  The worms have few natural enemies due to their toxic surface secretions and control is difficult.  However, because of their cannibalistic tendencies they may be their own worst enemy.  While humans are rarely cannibalistic, we are also considered our own worst enemy.  Rather than following an innate need to survive, the danger comes from a conscious choice to harm each other.  The choice can also provide compassion and aid.  Act for all.  Change is coming and it starts with you.

Domino

June 05, 2025

Yesterday morning Melissa asked me to come to the front porch and look at the beautiful flower that had sprung up overnight on one of her cacti.  With warmer weather she has placed many of her summer growing cacti on shelves along the front entryway.  This allows them to catch the early rays of sun and protects them from the rain we have been getting.  I have mentioned how Melissa says one of the worst things you can do for a cactus is to water it.  While they need moisture, if you over water it will cause root rot and kill the plant.  This is one of melissa’s newer cactus and the first time it has bloomed.  The domino cactus flower dwarfed the small globe of cactus it sprouted from.

When I went online, I found the domino cactus (Lobivia ancistrophora) has a globular shape, few spines, with large, white flowers attached to long, green tubes.  The domiono is endemic (native) to Bolivia at altitudes of 1,968.5 to 5,905.5 feet (600 to 1800 m).  It has gained the Royal Horticultural Society’s Award of Garden Merit under the synonym Echinopsis ancistrophora.  The domino has a single spherical shaped grey-green body, slightly depressed at the top.  The plant grows to heights of 2 to 3 inches (5 to 8 cm) with diameters of 2.7 to 4.7 inches (7 to 12 cm).  It has 10 to 12 straight, sharp ribs with small, cream-colored, elongated-elliptical bumps (areoles) that are 1/2 inch (1.5 cm) apart.  The small thorns are grayish brown and often hidden in the areole wool.  The upright central spine is again small (2 mm) with 3 to 7 tiny 1.5 mm) thorns at the base.  The narrow funnel shaped flowers are white to light pink and slightly curved above the ovary, are 6.5 to 7.8 inches (17 to 20 cm) long.  They appear on the side near the top of the shoot and open at night. The pale green flower tube is up to 5 inches (15 cm) long.  Its purple scales are pointed with long white and black hairs.  The flower blooms at night and then closes during the day.

The domino cactus is one of the many cacti that are night bloomers.  The night bloom is primarily to facilitate pollination by nocturnal creatures and to conserve water.  These cacti have evolved to attract pollinators which are active at night, like bats and moths.  Since the habitat where they thrive is cooler and more humid at night, a night bloom reduces water loss through evaporation from the plant’s leaves and flowers (transpiration).  The timing of cactus blooms is also part of a broader adaptation known as a pollination syndrome, where plants co-evolve with their primary pollinators to maximize pollination efficiency.  Melissa’s domino cactus is continuing its genetic predisposition.  While we do not have a lot of bats swooshing through our front porch, there are a lot of moths which could facilitate pollination.

THOUGHTS: The domino cactus is not native to the desert of Southeast Utah, but pollinating bats are plentiful.  My son and I used to camp by rolling our bedrolls out on the slickrock above the wadi beds.  Although the sand may have been softer, the rock got you above any possible flash flood from a rain 20 miles upstream.  One of my memories was listening to the swishing sound as the bats zipped through the air in search of insects.  I never saw a bat in the dark, but the sound of their wings was unmistakable.  Many desert plants have adapted to produce bright showy flowers, and a number of those produce a strong aroma, to attract pollinators.  Different environments have created selective ecosystems that have adapted to their conditions.  When humans interject new species or radically change the environment it can have devastating effects.  Some species will survive by adapting to the new environmental conditions, but many will either lose out to competition from the invasive species or die from lack of suitable habitat.  While change itself is inevitable, forcing change from artificially created human conditions is rarely good for an existing ecosystem.  Eventually however, mother nature wins, and often in surprising ways.  Act for all.  Change is coming and it starts with you.

It’s In

April 14, 2025

It has been an odd planting season (month) this year, to say the least.  It started four weeks ago when I went to the soil and mulch supply I had used for the Hügelkultur raised beds last year.  I had read that the limbs and wood on the bottom layer would decay over several years and as it does, the soil will sink.  At least I did not get the dreaded sink holes that can result when you do not compact the soil into the limbs well enough.  I ordered two skid scoops of topsoil but could only get one in my 8×5 foot (2.4×1.5 m) trailer.  I realized too late I wanted raised bed soil (a topsoil/compost mix) rather than topsoil.  I put the entire scoop into the four raised beds and when I went back for the second load, I changed my order to raised bed soil.  I used this to top off the raised beds and put a layer over two additional beds.  Melissa is going to scatter a wildflower mix in the bed in front of the house and I was going to put squash and lettuce in the back bed I had used for last year’s three sisters (corn, beans, squash).  I misjudged the amount of work this was going to take.  After two long afternoons the soil was finally laid down.  I breathed a sigh of relief and said, “It’s In”.

When I looked online, I found the Old Farmer’s Almanac says the average last frost date for USDA hardiness zone 7a is between March 22 and April 3.  It is Generally safe to plant most garden vegetables after this period, but you need to check local weather forecasts for potential late frosts.  We got excited and went to the plant nursery during the last weekend of March and got some great deals on six packs of peppers (Capsicum annuum), tomatoes (Solanum lycopersicum), and squash (Cucurbita pepo).  I was prepared to put them in the following Monday, but the weather person said there was a “possibility” of one of two frost days (they were right).  We put the plants on the porch with Melissa’s succulents where they could get sun and be out of the cold.  Melissa was countering the humidity for her succulents, so the fan was running 24/7.  The veggies did not like the fan and dried out quickly.  We brought them into the house and Melissa babied them.  Finally last week I was ready to take the risk and put them all in the ground along with the radish (Raphanus sativus), carrot (Daucus carota), beet (Beta vulgaris) seeds, and a hill each of cantaloupe (Cucumis melo) and watermelon (Citrullus lanatus).  I breathed a sigh of relief and said, “It’s In”.

I had worried as I planted the veggies last Monday as several were looking poorly.  I mulched and watered them for several days before I bought replacements and replanted five.  As the week went on several more withered and died.  I removed the store plants and planted seed for several straight necked squash and cucumbers (Cucumis sativus).  As I watered this morning, I faced the dilemma of what to do with three tomatoes and two bell peppers that were struggling.  It was iffy whether they would survive and if I waited to act it would probably be too late for seed before the summer heat.  I went back to the co-op and found a six pack of Cherokee purple tomatoes and two single peppers.  That meant I had more plants than planters, but the six pack was the same price as one single (I needed two).  I ended up placing two of the tomatoes in the back bed with the squash and found another container for the third.  I breathed a sigh of relief and said, “It’s In”.        

THOUGHTS: Each time I said, “It’s In, I thought the job was over.  While I could have left the empty containers and garden spaces I was unwilling to do so.  I had already invested too much time and energy to quit when I was so close to completing my planting.   I did tell Melissa after finishing today that I was not going to buy any more plants.  If any fail now their spaces will be reserved for my summer/fall planting.  In gardening and life, you need to be willing to overcome initial setbacks.  You also need to know when it is time to change strategies and tactics.  Doing the same thing and expecting different results rarely works.  Act for all.  Change is coming and it starts with you.

Planning

February 28, 2025

It was near or above 70’sF (21C) most of this week, and that after dropping to single digits a week ago.  Warmer temperatures have got me thinking about my garden.  This time last year, I was planning the garden layout and had seedlings under the grow lights.  My main push was trying to collect enough wood, fill, and dirt to create the four Hügelkultur raised beds.  Every step of the process turned out to be more work than I had imagined (and I imagined a lot of work).  This year will be more tweaking the beds and growing methods I already own.  When I started four years ago, I grew everything in container pots.  These were mostly 5-gallon (19-L) buckets, along with several wooden planters left from my mother-in-law and a few large flowerpots.  Now I have moved almost entirely away from my old containers.  This year’s plantings will go into a mix of raised beds and grow bags, along with the three in-ground beds.  I cleaned out the different planting medium when I shut down last fall.  I had also purchased three additional (5 total) rolling, self-watering tomato planters that I put together.   Then it was a matter of planning how to proceed, then cleaning up and placing the different containers along the back fence of my patio.

When I looked online, I found different sites that assured me they could help me with planning the perfect garden.  These ranged from pre-planned gardens (for beginners), to garden guides and layouts, and even complete kits selling seeds and directions for how to plant.  Several of the self-help guides were “old school” and allowed you to draw your plots on lined paper and then add cut-outs of the various plants so you could move them around to ensure the best placement.  Others were high tech with software to walk me electronically through the (same) planning process.  Being trained as an historian I am partial to paper that I could put my hands on, but I was not ready to revert to my elementary school days of cut and paste.  I decided what I needed to start my journey was a planning checklist to walk me through the stages in the proper order.  What I found was literally called, The Ultimate Garden Planning Checklist.  I printed a copy so I could hold it.

The checklist began telling me what to do 3 to 4 months prior to planting.  We are now 6 weeks from the last frost in zone 7, so I missed that part of planning.  I have an excuse as we were in Greece the first three weeks of February, and everything would have died had I started seedlings in January.  There were still some of the later seeds that could be started (6-8 and 2-4 weeks out) but I will have to push to get them going in time for the April 15 target date.  Last year I did not adequately harden off the seedlings and most of them died either on the screened porch or after planting.  I am going to try and do better this year.  It is not subsistence farming if you buy your plants from the greenhouse.  I need to refill parts of the raised beds, put compost and soil in the containers, and decide what I am going to do with the front beds.  I still have lots of planning left to go.

THOUGHTS: Taking time for planning is necessary if I want my garden to produce.  Each year I get a little better at both planning and deciding what and how to plant.  I am challenged as I see the hours spent by Melissa with her succulents.  I have mentioned how Melissa’s mom would spend hours a day working on the flower beds.  I know both are a labor of love.  I am at the stage where my garden is still a labor of like.  Being skilled at anything is a combination of talent and a lot of time spent doing it.  This is true in business, in sports, and especially in interaction with people.  You may get by on a labor of like in dealing with others, but real communication requires you practice until it becomes a labor of love.  Act for all.  Change is coming and it starts with you.

Wrap Up

November 18, 2024

In the HOMES section of Sunday’s newspaper (delivered on Saturday’s) there was an article providing advice to want-a-be gardeners. October (missed it) and November are the best time to wrap up your gardens and prepare for your spring planting. Fall is also the best time to plant trees and shrubs to let them get established before the freeze sets in. Rather than raking leaves consider mulching them and collecting fallen branches in a pile to protect local wildlife (or the neighborhood cat). Deep watering trees and shrubs will send them into the winter well-hydrated and give them a jump-start in the spring. While we may be preparing the inside of the house to welcome holiday guests, it is important to wrap up the outside for this season of dormancy.

When I looked online, the Farmer’s Almanac cited 11 Steps to wrap up your vegetable garden in the fall. This began with removal of any spent plants and debris that may have accumulated. While much of this can be composted, any diseased plants need to be disposed of in the trash. Beans and peas should be chopped off at ground level to leave their nitrogen-fixing roots to feed next year’s crops. Disease/insect free material can be added to your compost pile. This is also a good time for a final weeding to prep for next spring. If you are planning on new beds this is the time to scalp the grass and lay down newspapers with a cover of compost and mulch to prepare the soil. The falling leaves are a great mulch and a good source of nutrition. Your beds could also use compost in the fall to allow microorganisms to break it down throughout the winter. Fall is the time to consider crop rotation for the coming year. It is never good to grow plants in the same family in the same place year after year as it could allow pests and diseases specific to that family to thrive and depleting the soil of the same nutrients each year. This is a good time to test your soil for nutrients and the proper pH for the new crop by contacting your local Cooperative Extension or garden center. You may want to plant a cover crop to protect the soil, and this provides additional nutrients when you till them into the ground in spring. October and November are the best times to plant garlic as the plants need cold temperatures to produce huge yields. Finally, remove all supports an cages and wash and spray them with a two-to-one solution of water and bleach to kill disease. I guess I have got some work to do before I can wrap up my gardening for the winter.

Preparing to wrap up the garden is also about taking care of your pots, tools, and equipment. The water hose needs to be turned off and drained and, in our area (zone 7), the spigots need to be covered to prevent freezing. Garden tools need to be cleaned, sanded, and oiled before storing them for the winter. Any frames or supports should be wiped down with soapy water and allowed to dry before being stored (inside) for the winter. Ceramic and clay pots need to be moved inside to prevent cracking during freezing temperatures. You can dump the soil in your beds and then sterilize the pots with a diluted (1/2 cup per gallon) bleach solution. It was suggested not stack these pots, as it may be hard to get them unstuck in the spring. So much to do before I can stop doing anything.

THOUGHTS: As I prepare to wrap up my garden I am still harvesting crops. My pole beans (Phaseolus vulgaris) produce several cups of fresh beans every couple of days, and I have nearly ripe tomatoes (Solanum lycopersicum) on most of my vines. I am giving them as long as possible to ripen before the coming big frost the weather people keep predicting. Still, I can complete most of these preparations. Preparing my pots and tools will clean and keep them from rusting as they sit on the back porch. Being willing to wrap up is both hard and necessary. That is true for gardening and in life. When I retired, I thought it was a wrap up. Instead, it was the start of my next assignment. Humans need to have a purpose to survive. Act for all. Change is coming and it starts with you.

Long-term

October 23, 2024

I have mentioned how most of my vegetables have matured and stopped producing.  The exceptions are the pole beans (Phaseolus vulgaris) representing the last of my three sisters’ harvest.  They started late but now still provide several cups of beans every few days.  The raised beds are empty except for the 5 rattlesnake watermelons (Citrullus lanatus) struggling to mature, the 2 late starting green bell peppers (Capsicum annuum), and the 2 red okra (Abelmoschus esculentus) that produce beyond their limit.  There are also 8 cabbages that are finally picking up as the temperatures cool.  I really did not expect much from my tomatoes as the heat kept them from much production during the summer (I did get 3 jars of pasta sauce).  The friend I swap gardening stories with said she tore her tomatoes and peppers out several months ago to avoid having to water them.  We are having temperature shifts as the nights get into the 40’s (4.5+C) and the days get to the high 80’s (27+C), causing a resurgence of my San Marzano and plum tomatoes, making me wonder what to expect in long-term production.

When I looked online, I found that depending on their maturation date, “indeterminate” tomato (Lycopersicon lycopersicum) cultivars are the best long-term producers and will yield tomatoes for two to three months.  “Determinate” tomatoes, including dwarf and bush cultivars, typically only yield tomatoes for around two weeks after they blossom.  Tomatoes are grown as perennials in tropical climates and as annuals in USDA plant hardiness zones 2 through 10.  Traditional and heirloom indeterminate tomato cultivars continue to grow taller throughout the growing season and will reach heights of 5 to 8 feet (1.5 to 2.5 m) and typically require support with a wire tomato cage or stakes.  They grow flowers and yield tomatoes from shoots or “suckers” that grow on the sides of their main stem from the time they mature and flower until the first autumn frost.  The best long-term producing cultivars are those that mature early and grow in an area with a long growing season.

Most cultivated tomatoes in my area (zone 7) are planted soon after the last spring frost (c. April 15) and the fruit is expected sometime between 57 to 100 days after the seedling is planted.  If you plant an indeterminate tomato cultivar, you are encouraged to prune the vines regularly to maintain a long harvest of large, quality tomatoes.  I have done this in the past, but I have only done this sporadically this year.  The University of Arizona horticulturalists recommend pruning all but three or four of the shoots that grow in a tangle inside the cage and allow the foliage to protect the fruit from the sun.  If you don’t prune the suckers, these stems consume a lot of a plant’s energy and may result in smaller yields and fewer tomatoes (like I saw).  I did use 4 foot (1.2 m) cages but as the season went on the plants far exceeded that height.  I found out the San Marzano I planted for pasta sauce are a larger variety of plum tomatoes (I planted both) and are some of the better plants in long-term production.

THOUGHTS: As the temperatures dropped, I quit the daily watering I maintained throughout the summer and removed the dying vegetable plants one by one as they ceased production.  A month ago, I was tempted to tear out all of my tomatoes as they had essentially stopped producing fruit but kept them to see what the long-term might bring.  Now they are again producing blossoms and fruit.  I had little to lose when I took a long-term approach in my vegetable garden.  If the plants failed to produce, I would not have been out much in terms of time and water.  Since they did produce, I will reap the benefit of fresh tomatoes into the fall.  Corporations seem less willing to take a long-term approach toward products or employees.  If the product does not make a quick profit, it is dropped.  If the employee does not prove productive, they are let go.  While moving from one product to the next might make economic sense, employees should not be used as expendable.  Act for all.  Change is coming and it starts with you.

Carrots

October 10, 2024

Only a few plants remain in my raised beds as we approach the end of the growing season.  I have two bell peppers (Capsicum annuum) that had been overshadowed by the cutleaf ground cherry (Physalis angulata) that had self-propagate and taken over three of my raised beds.  After I ripped the plants out of the bed these two scrawny plants were hidden underneath.  I had no idea what they were but decided to let them grow.  They are now producing fruit, while the peppers in my containers have stopped producing and the wilted stems have been removed.  The 2 red burgundy okra (Abelmoschus esculentus) are still going strong at over six feet (2 m) with new blossoms daily.  If only I liked okra.  I am thinking I might try and pickle some smaller fruits as it is the only way I can eat them.  The watermelons are still trying to produce, with five new melons on the vine.  Then there are the five cabbage plants (Brassica oleracea) struggling to survive.  I did not pay close enough attention and most of my leafy vegetables were eaten by insects.  I never saw them, but the holes in the leaves gave away their presence.  The only other crop is the carrots I had planted at the end of April.

When I looked online, I found the carrot (Daucus carota subsp. sativus) is a root vegetable, typically orange in color and is a biennial plant in the umbellifer family (Apiaceae).  Heirloom variations can be purple, black, red, white, and yellow.  All of the subspecies are domesticated forms of the wild carrot which is native to Europe and Southwestern Asia.  The plant probably originated in Iran and was originally cultivated for its leaves and seeds, but the most common part of the plant now eaten is the taproot.  The domestic carrot has been selectively bred to have a larger, more palatable, and less woody-textured taproot.  Carrots are commonly consumed raw or cooked in various dishes and are a rich source of the provitamin A compound (beta-carotene), which converts to vitamin A as it is digested.  Fast-growing cultivars mature within about 90 days of sowing the seed, while slower-maturing cultivars need 120 days.  World production of carrots (combined with turnips) for 2022 was 42 million tons, with China producing 44% of the total.

I do not know if I planted a fast growing or slow growing variety of carrots, but my carrots have been in the ground for over 160 days.  When I planted them, I made a single slit in the ground and shook the tiny seeds into the ground.  I had planted them too close together and when they sprouted none of the seedlings had enough room to flourish.  I tried thinning them several times but never seemed to get them far enough away from each other to give them room to grow.  Every time I checked or thinned them, they were still needle thin.  Several of the tops had become larger recently and today I decided it was time to quit messing with them and harvested the batch.  I did have one descent sized carrot, and a lot of smaller (but passable) ones.  I tried one and gave another small one to Melissa.  While they may not have grown large, they did taste good.           

THOUGHTS: The carrots suffered the same fate as all my root vegetables.  I did not space them enough and even thinning them did not give them enough room to grow.  I watched a YouTube video suggesting I plant them in squares to make sure there was proper spacing to grow.  More knowledge to save for the future.  I did not do a second planting of any of my vegetables (in August).  I had grown weary and was not paying enough attention to the plants I already had in the ground.  I guess sustainability is still a long way off.  Overcrowding has the same effect on humans as it does carrots.  Human overpopulation suggests we may become too large to be sustained by the environment or the Earth’s resources.  Estimates of the world’s carrying capacity predict a maximum of 7.7 billion.  We now stand at over 8 billion and rising.  Unless this is addressed, like my carrots the world will self-correct itself.  Act for all.  Change is coming and it starts with you.

Euphorbia Ingens

September 27, 2024

Melissa was working on her succulents over the weekend and called me out to see what was going on with her plants.  We had placed two tables in the flower bed on the north side of the house that we have yet to figure out what to do with.  Melissa decided in the short run this would be a good place to put some of her hardier cacti to take advantage of the outside.  Although these plants are visible through the porch windows, Melissa does not get out to physically check on them more than once a week.  As with most cacti and succulents, a good rule of thumb is to leave them alone and let them thrive on their own.  One of the plants has been growing particularly well over the last two years and is over 3 feet (1 m) tall.  The third section of the plant had developed greenish-yellow buds along its ridges which appeared to be ready to bloom.  When I asked, she told me this was a Euphorbia ingens (I sometimes think she uses the scientific names just to throw me off).   

When I looked online, I found the candelabra tree (Euphorbia ingens), or naboom, is a species of flowering plant in the family Euphorbiaceae native to dry and semi-savanna areas of southern Africa.  This tree is a tall succulent with green round-like branches resembling a balloon that grows to 19.5 to 26 feet (6 to 8m) tall.  The trunk of the candelabra is thick, and the stems have 5 ridges each and are 1-1/3 to 3 inches (3.5 to 7.5 cm) thick.  The segmented stems are dark-green and young sprouts have paired spines 3/16 to 5/64 inches (0.5 to 2 mm) long.  The plant blooms from autumn to winter and the small greenish yellow flowers sit on the ridges of the topmost segment.  A red, round, three-lobed capsule fruit turns purple when ripe.  The plant’s flowers are attractive for butterflies, bees and other insects, which pollinate them when gathering pollen and nectar.  The seeds are edible for birds, who also like to make their nests in the branches of these trees.  The light and solid wood of the main trunk is used in door, plank, and boat production.  The milky latex sap of the tree is highly poisonous and can cause blindness, severe skin irritation, and poisoning (when ingested) in humans and other animals.  The plant has few pests due to the toxic sap.

Euphorbia ingens grows well both indoors and outdoors and has become a popular choice for rock gardens and indoor houseplant collections due to its stately appearance and low maintenance.  In their natural environment, these succulents can grow up to 40 feet (12 m) tall, but they usually top out around 8 to 10 feet (2.5 to 3 m) tall when grown indoors.  Still, even this would take a high ceiling to accommodate a mature plant.  When grown indoors or in containers, it is extremely uncommon for this species of euphorbia to produce blooms.  Since Melissa’s plant has budded, we are waiting to see if it will break into full bloom.

THOUGHTS:  The buds on the Euphorbia ingens are only the latest of Melissa’s accomplishments.  Over the last two years she has repeatedly shown me the flowers that have bloomed on many of the succulents and cacti that are under her care.  In my case, with the exception of the ground cherry (Physalis angulate) that I did not plant and the red burgundy okra (Abelmoschus esculentus) I do not like to eat, I have often struggled with production of my plants (pole beans are another exception).  Melissa’s mom was a prolific gardener whose secret was to spend hours tending her flowers.  The same it true with Melissa who spends hours with her succulents.  I am willing to plant, water, and harvest.  Perhaps there is a lesson there.  When we are willing to put in the work, we can achieve most tasks.  That is true for gardening.  That is also true for creating positive human interaction.  Do the work.  Act for all.  Change is coming and it starts with you.

2nd Sister

September 24, 2024

I was excited over the weekend when I went out to check the remnants of the three sisters planting to find the pole beans (Phaseolus vulgaris) had finally begun to produce.  I have mentioned the poor production for the 1st sister, corn (Zea mays var. rugosa), with only dried kernels suitable for grinding or bird food.  That was followed by an ok harvest of the 3rd sister, Butternut squash (Cucurbita moschata), which produced 7 gourds.  It has now been nearly a month and while there were lots of flowers and buds, I had not seen any beans hanging from the vines until last weekend.  The vines had been growing well, even causing some of the drying corn stalks to collapse and again lay on the ground.  I felt lucky for having staked the stalks after their infamous “leaning” event in July.  I knew at least some of the stalks would be able to stand despite the weight of the bean vines.  Yesterday I decided to see if I could find anything worth harvesting among the twisted vines.  I was anxious to see the result from the 2nd sister.

When I looked online, I found the common bean (Phaseolus vulgaris) is an herbaceous annual plant grown worldwide for its edible dry seeds or green, unripe pods.  The bean’s botanical classification (as all Phaseolus species) is a member of the legume family Fabaceae.  Common beans acquire the nitrogen they require through an association with rhizobia (like most Fabaceae), or nitrogen-fixing bacteria.  The bean has a long history of cultivation with the wild Phaseolus vulgaris native to the Americas.  It was originally believed that it had been domesticated separately in Mesoamerica and in the southern Andes region 8000 years ago, giving the domesticated bean two gene pools.  Recent genetic analyses show that it was first domesticated in Mexico, and then split into the Mesoamerican and Andean gene pools.  As the 2nd sister (by planting order), maize (corn), beans, and squash are the three Mesoamerican crops that constitute the “Three Sisters” that were central to the indigenous agriculture.  All wild members of the species are climbing, but many cultivars are now classified as bush beans or climbing beans, depending on their style of growth.  Beans are grown on every continent except Antarctica, and during 2022, there were 28 million tons (28000 kt) of dry beans produced worldwide, led by India with 23% of the total.  The common bean arrived in Europe as part of the Columbian exchange, the widespread transfer of plants, animals, commodities, precious metal, culture, human populations, technology, diseases, and ideas between the New World (the Americas) and the Old World (Afro-Eurasia) in the late 15th and following centuries.

While I had (inadvertently) planted bush beans in my raised beds, I planted pole beans as my 2nd sister.  I have mentioned how bush beans are preferable for commercial cultivars as the fruit tends to ripen at the same time (yes, beans are another fruit that is eaten as a vegetable).  I harvested the bush beans last week and got a small return (the bowl in picture).  Unlike the bush beans I planted in the raised bed, the pole beans are expected to provide a continuous harvest throughout the growing cycle.  I look forward to several more weeks of harvest from my 2nd sister.    

THOUGHTS:  I was pleased with the harvest from the 2nd sister.  The first pick of pole beans yielded over 6 quarts of processed green beans.  I flash froze 4 quarts and plan for the other 2 quarts to be mixed with onions, bacon, and the Yukon Gold potatoes (Solanum tuberosum) I harvested earlier this month, for a meal later this week.  This Thanksgiving, I plan on providing a green bean casserole for the family using my home grown beans.  This is one of the joys I find in (trying) to provide subsistence agriculture.  While there are trials (i.e., the other sisters) in growing your own food, they make the successes sweeter.  This also forces me to explore a variety of preservation techniques.  Life-long learning is a good thing.  Act for all.  Change is coming and it starts with you.